Semi-automatic clipping for lazy typesetters, Part 1
When I recently came across a sign that required hundreds of frame-by-frame clips to be properly typeset, I noticed the distinct lack of automation tools and procedures to cut down on the tine required for this rather common task. The following procedure is the best i could come up with by using tools i already know: Aegisub, AviSynth+ and Adobe Ilustrator. If you prefer e.g. CorelDraw over Illustrator or AfterEffects over AviSynth you can easily substitute the respective parts of the process.
Prerequisites
Aegisub
This tutorial assumes you know your way around AegiSub and doesn’t touch on anything typesetting related beyond pasting then generated clips into your existing frame-by-frame sign. Required Macros: MultiCopy (install via DependencyControl)
AviSynth+
Since this guide is aimed at typesetters, no prior AviSynth knowledge is required. I will, however, only cover the basics required to create a usable masks for content that lends itself well to color/luma-masking. If you’re interested in getting more in-depth with AviSynth, there is lots of documentation provided with the plugins used in this guide for further reading. Required Software:
- AviSynth+ r1576
- AvsPmod 2.5.1 r426
- HiAA 0.13 as well as quickTraceMask and required Plugins/Scripts (all conveniently pre-packed for you here)
Setting up the AviSynth+ and AvsPmod workflow
- Download and install AviSynth+
- Download the plugin package and unpack it into
%ProgramFiles(x86)%\AviSynth+ - Download AvsPmod and unpack it into your Program Files folder (or wherever you wish). Make sure your regular user account has write access to this folder, or you’ll have to run AvsPmod as Administrator every time you want to use it.
- Run AvsPmod and go to
Options > Keyboard Shortcuts. Scroll down toMacros -> GetPixelColorand assign a shortcut as we are going to need this for creating color masks.
Adobe Illustrator
The tutorial will walk you through the required steps, but I’ll assume you have some basic knowledge of vector graphics (principles and terminology) and have used vector graphics software for simple tasks before. Required Software:
- Adobe Illustrator (Windows or MacOS X) CS6 and up
- My Batch Trace script and required includes/libraries. Download this and unpack everything in the Illustrator sub-folder into your Illustrator scripts folder, which is
%ProgramFiles%\Adobe\Adobe Illustrator CC (64 Bit)\Presets\en_US\Scriptsfor an English install of 64-bit Illustrator on Windows, but differs between versions and platforms. - torques Ai2ASS
Creating the Masks
As a first step we need to create a black-and white mask image for each frame of our scene, seperating the parts we want to (i)clip later. The mask needs to both reasonably precise and smooth enough (read: not noisy) to trace into vectors. Since we’re dealing with anime, our chances to achieve this using color key and/or luma (brightness) masks are pretty good.
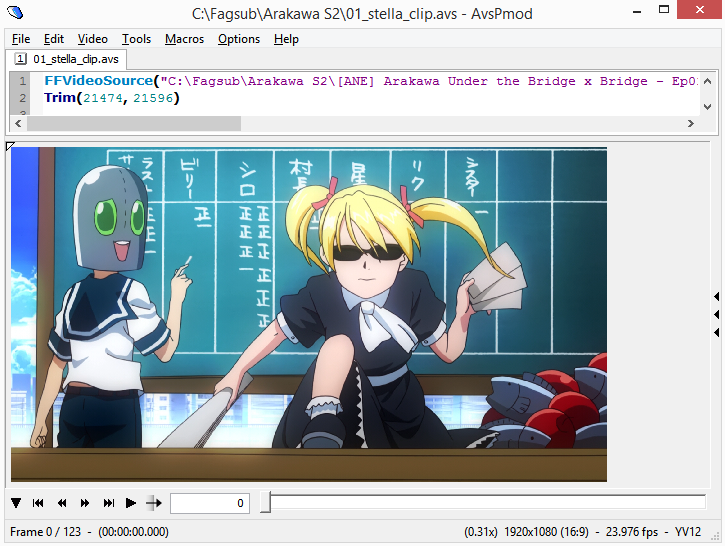
- Open AvsPmod if you haven’t already and drag your video file into the empty script. This will insert a source filter (most likely FFVideoSource) which loads your video and returns a clip to process. Since we only want to process one scene and not the whole show, we need to trim the clip. Get your start and end frame numbers from Aegisub and write Trim(start, end) on a new line.
- Now hit F5 to load the video preview. Loading a video for the first time might take a while, since ffms needs to create an index. Now is also a good opportunity to save the your script. At this point you should be looking at something like this:
- To start building the mask, insert the following line into the script:
quickTraceMask(colors="", show=true, mode="and") - To add a color to the mask move your cursor between the 2 double quotes of the colors of the
colorsparameter, which is where our color picker macro will insert color codes. Move your mouse over an area of the video preview that has pixels of the desired color and press the hotkey you configured to run the GetPixelColor macro, which adds the color code to the empty parameter. To see the results, hit F5 to refresh the video preview. The masked area will be highlighted in green.
- Continue adding additional colors to the mask and tweak the
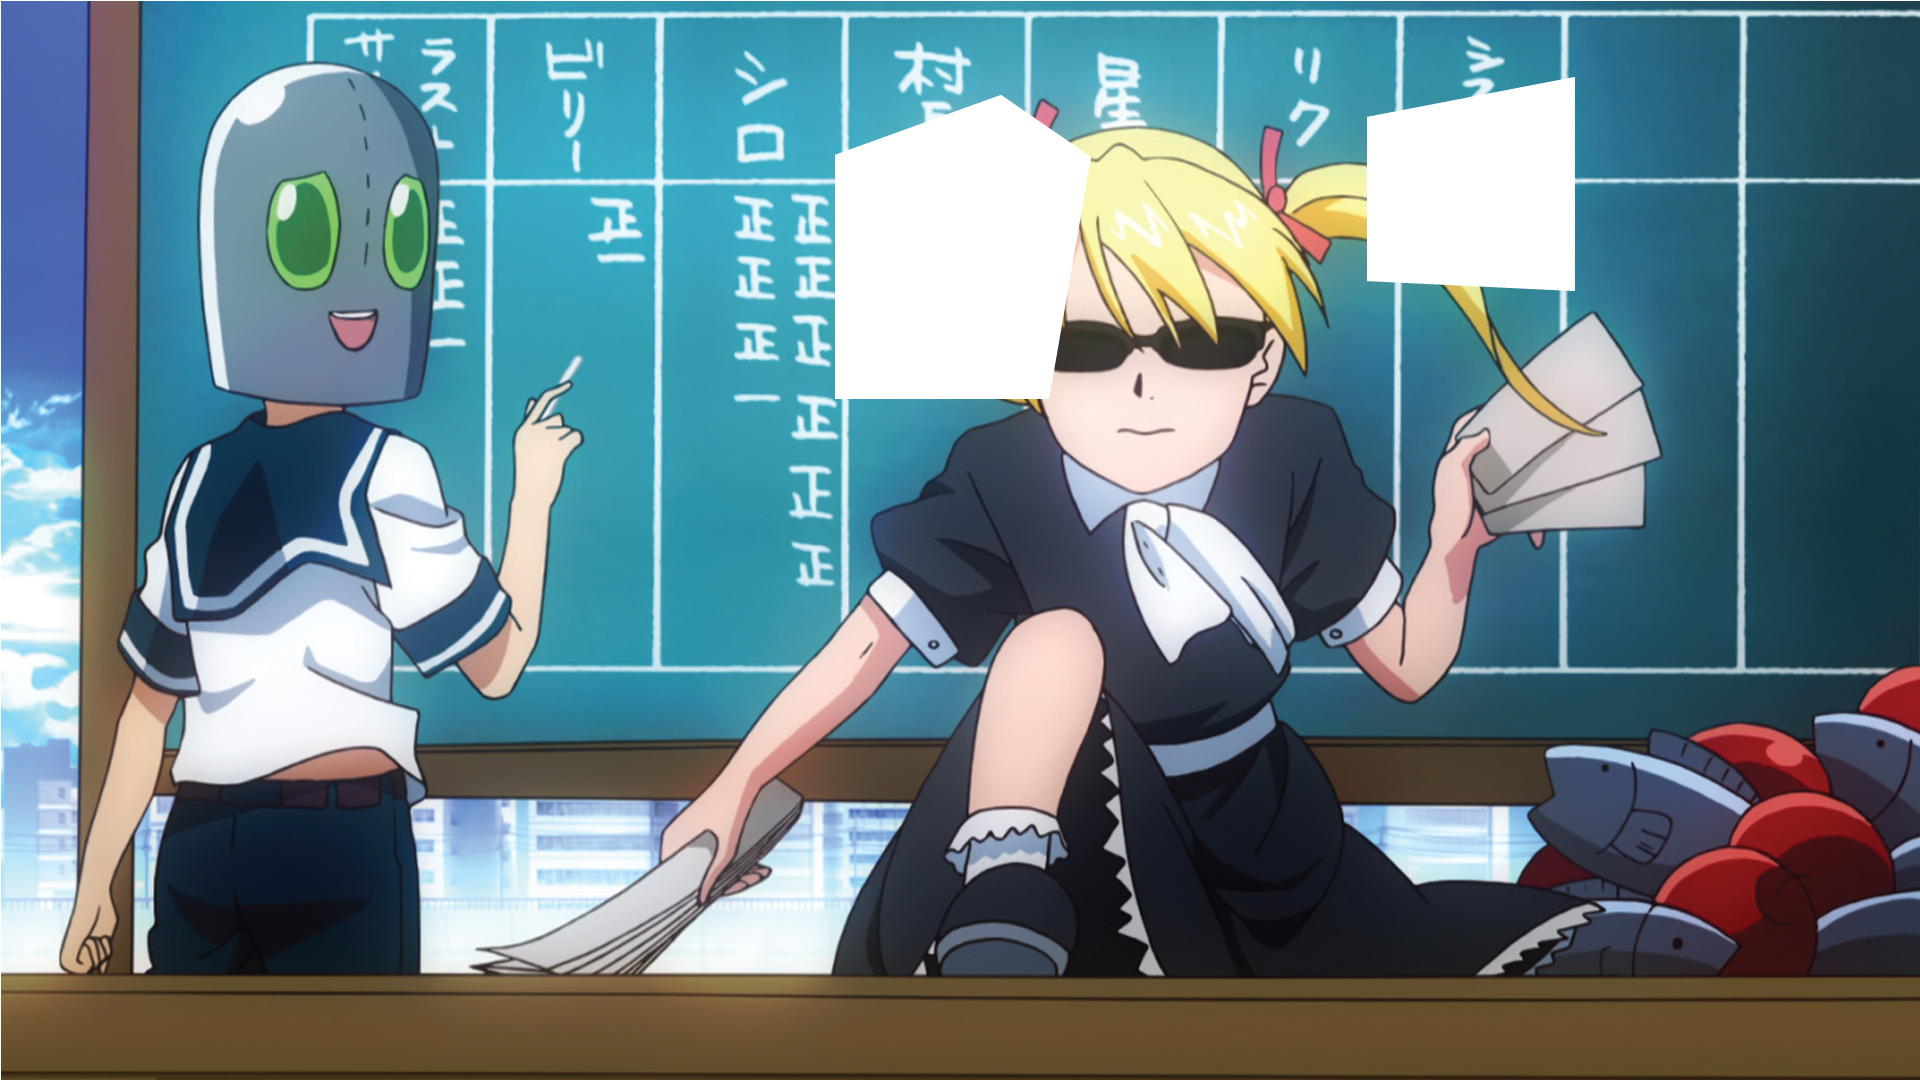
toleranceandexpandparameters until you’re satisfied with the result. When done, set theshowparameter tofalseand refresh the video preview to see the raw mask. The result should look like this (I used a slightly more complex script for this mask):
- Now that we have our mask clip, it’s time to export all frames as images. Save your script and go to
Macros > Save Image Sequence. Pick an empty folder for the image sequence to be saved in, choose All Frames, set the output format to PNG and make sure the Add the frame number as suffix option is checked.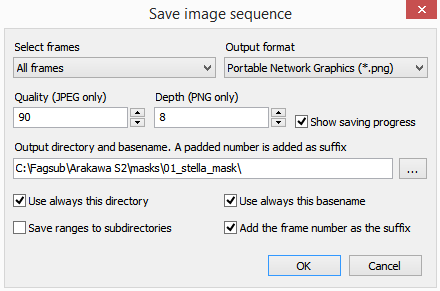
- Click OK to start exporting the image sequence.
Tracing the masks
To be able to use our masks as clips, we now need to trace the raster images into vectors.
- Fire up Illustrator and create an empty document with dimensions matching the video resolution
- Setting up a custom tracing preset is important if you want good results. Take an image from the exported mask sequence and place it in your AI document. On the top toolbar, click Image Trace and open up the image trace window. The following settings are required for the script to work:
- Mode: Black and White (this one should be obvious)
- Method: Abutting
- Create: only Fills checked
- Options: Ignore White checkedPlay with the Paths, Corners, and Noise settings until you get a satisfactory result and save your settings as a preset.
 If you name your preset
 _autoTrace, the Batch Trace script will select it by default. Remove the placed image.
- Usually only a small area of the whole mask is interesting to us, so to keep down the bloat, we’re going to draw a path which will intersect only the vectors in the area it covers causing the rest to be dropped. Copy a frame of the sign from Aegisub into Illustrator and make sure it’s placed correctly (top 0, left 0). Now draw your path (which can be a everything from a simple rectangle to a complex compound path) on top of it.
 When you’re done, remove the image
 - Go to File > Scripts > Batch Trace. Set Image Folder to the folder containing the mask sequence, select your Tracing Preset and make sure the Intersect with predefined path setting is checked.
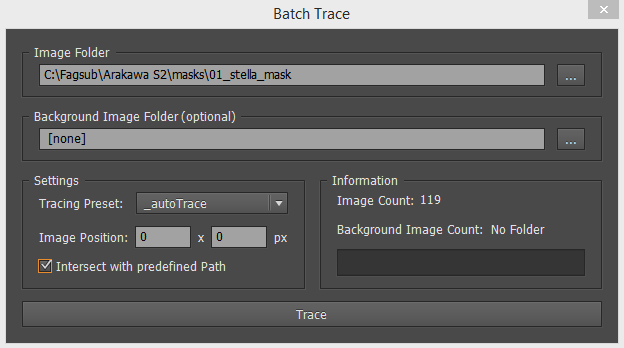 If you’re planning to check and adjust the traced frames, it’s wise to also supply a (different) Background Image Folder which holds an identically numbered sequence of the original frames. These will be placed in the background of each frame/layer, so you can see what you’re working on. Click Trace and watch the script do its magic (or grab a beer).
 - After the script finishes the dialog closes and the first traced mask (now paths) should be displayed.
 Every video/mask frame has its own layer, so you can navigate them by exclusively making them visible - one layer at a time (palette script to make this more convenient is already planned).
 - When you’re done making adjustments, select all layers except the bottom layer (which contains the intersect path we created before running the script) by clicking
 at the top right of the layers panel > Options for Selection and checking Show (or Alt+Click somewhere in the leftmost column of the layer panel).
 - Open Ai2ASS, select collectAllLayers, make sure \C_lip mode_ (tbd) is checked and click Export. Grab another beer and then copy the generated (i)clips to the clipboard.
Pasting the Clips
- Back in Aegisub, select all lines (one layer at a time) of your frame-by-frame typeset and run MultiCopy.
- Set Paste specific to any tag and click Paste from clipboard.
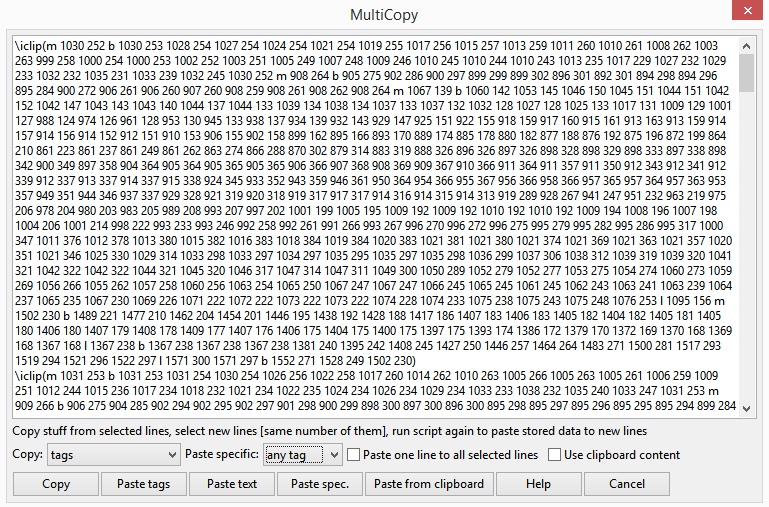
- Remove the top (
{AllLayers}) line and click Paste spec. - Done.
quickTraceMask parameters
quickTraceMask is a little script I have thrown together to allow you to quickly create a mask without having to worry about the details for now. It has 11 Parameters:
[clip] c: The video clip passed to the function. If we don’t specify it, thelastclip will be used automatically.[string] colors: A list of RGB colors in hex format ($rrggbb) separated by spaces. Pixels in the image that match those colors will be black in the mask.[int] tolerance: Maximum allowed difference between pixel color and colors from the colors list for the pixel to be still considered a match. (Default: 10)[int] lumalow: Lowest luma value (brightness) that is considered a match. (Default: 0)[int] lumahigh: Highest luma value that is considered a match (Default: 255)[string] mode: Logic operator used to combine color and luma matches. Supported operators are: and, or, xor, andn. (Default: “and”)[int] expand: Allows you to expand the mask into adjacent unmasked areas. Very useful for masking line art. Negative values will inpand (shrink) the masked areas. (Default: 3)[int] postexpand: Second expand/inpand pass. If you setexpandto a positive value andpostexpandto a negative value, you can close small gaps in the mask without moving the outer boundaries too far. Be aware that using large values may cause small elements like hair to change shape of small, which is usually not what you want.[float] ss: Supersampling factor, which causes the video to be upscaled to a higher resolution before masking resulting in a smoother mask and more finely grained expanding capabilities. (Default: 2.0)[bool] aa: If set to true, anti-aliasing will be applied to the mask to help tracing. (Default: true)[bool] show: If set to true,quickTraceMaskwon’t return a mask, but the original video with a green overlay on masked regions. This mode is extremely useful for previewing and setting up the mask.[bool] bt601: If set to true, uses the BT.601 color matrix instead of BT.709 color matrix for RGB color values. (Default: false for HD video, true for SD video)